Rainbow Inspired Nail Art Designs | Pride Nails
It is time for the pride parade but why not add some rainbow to your nails. With a splash of color, these nails are perfect for the summer season, and spring season. Even if you do not have all 7 shades of the rainbow, you can do your nails with a twist. Here are some of my best works with a rainbow theme that I did. If you like, head on to my Youtube channel for the tutorial. https://youtube.com/c/crazynailzz
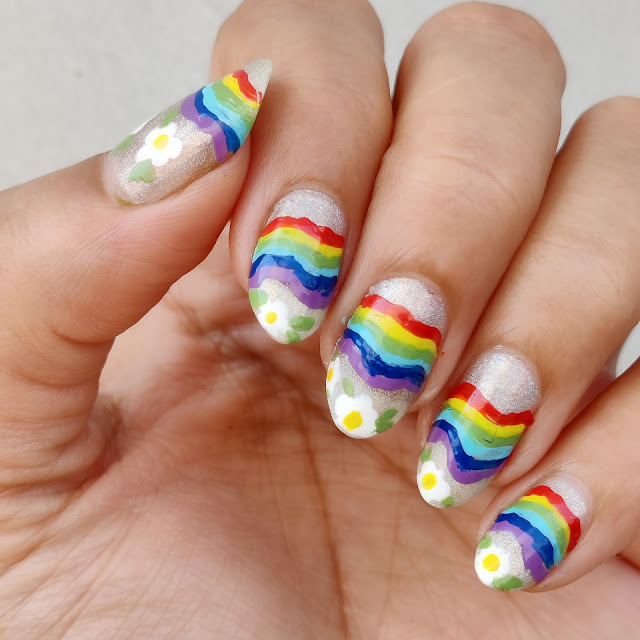
Wavy Rainbow nails
This is a fairly easy nail art design done with a pearly base and lots of color on top. Start with creating a shimmery sheer base coat. Apply waves of all colors of the rainbow in the middle of the nails. Follow it with white daisies made with a dotting tool and add a few green leaves to it. You can either make french tips with this or make them at the cuticle. Once it has dried up, apply your favorite top coat, matte or glossy.
Wavy Colorblock nails
This is something different that I did recently. Make waves using white and black polish alternatively on both nails. Now fill the corner waves with colors of the rainbow. Add some dots in the middle using white and black polish. Top it with your favorite top coat. The tutorial is available on my Youtube Channel https://youtube.com/c/crazynailzz
Rainbow inspired negative space nail art
For this nail art, you need one light and one dark shade of the same hue. Like Dark purple and light purple. Apply one swipe of dark on one half of the nail and light color on another half. Now once the polish has dried, apply an egg matter topcoat or use a fan brush dipped in black polish for this effect. Top it with a matte top coat and you are done. The tutorial is available on my Youtube Channel https://youtube.com/c/crazynailzz
Rainbow inspired summer beach nail art
If you live stamping, this nail art is for you. Using all hues of the rainbow, make a base for the nail art. You can use a stripping brush for this trick, applying one line of color for each shade. Now once it has dried, using the summer-themed stamping plate, apply the design of your choice. I used the beach theme. Top it with a top coat.
Rainbow marble nails
This is marble-style rainbow nail art. I used all seven shades of the rainbow for this. The base is clear polish. Start by placing small drops of polish, using all colors of your choice on a plastic sheet. Apply top coat on your nails and when it is wet, take the shades in one swipe on a flat nail art brush. Now slowly transfer the shades on the nail, creating an effect and slowly moving the brush to keep it horizontal. Once it has dried up, apply the top coat. You can watch the tutorial on my Youtube channel.
I hope you liked these nail art designs and will enjoy them. What is your favorite rainbow nail art design? Share it with me on Facebook or Instagram.
Lots of Love!!!
XOXO


Comments
Post a Comment